
A Smaller Chuck Box
by Kurt Huber | Published 6/3/2018
IT LOOKS COOL, BUT CAN YOU MAKE IT SMALLER?
One of the more common comments about the Camping Kitchen Box is "It looks cool, but can you make it smaller?" Well after some noodling, some head scratching and some prototypes that went straight into the recycling bin, the answer is "Yes!"
I am proud to present the "Camping kitchen Box 650" the little brother to our classic chuck box, which is now know as the "Camping Kitchen Box 1000".

The new Camping Kitchen Box 650 on the left, and our traditional chuck box on the right.
SO WHAT ARE THE DIFFERENCES BETWEEN THE TWO BOXES?
Well first of course is the size. The new box is about 2/3 the size or the original. They are both 22 1/2 inches tall, and both about 16 inches deep, But the new box is only about 17 inches wide (not counting the handles) as compared to the original which is 24 1/2 inches wide (once again not counting the handles). For some folks this is the difference between unwieldy and easy to handle.
Smaller size of course means less weight. The traditional CKB weighted only 10 pounds empty, but the new box weighs an even more incredibly svelte 7 1/2 pounds.
So with the smaller size what are you giving up? Mostly the ability to carry a two burner stove in your chuck box. If you don't count the upper stove compartment both boxes actually have similar storage space.
As you can immediately tell from the pictures the new box has three drawers. When I first started tinkering, it was kind of obvious that a smaller box would have fewer drawers... until of course it became obvious that having the three drawers solved a lot of design issues.
You may have also noticed the doors are different. The original box has folding doors with "living hinges". Unfortunately theses living hinge doors did not scale down. When made shorter, the folding doors just did not fold enough. To solved this problem I had to come up with a new scheme., which turned out to be separate doors that slide in tracks in the front of the box. After you open the box by sliding the doors out, they can be quickly clipped to the side of the box, where they are out of the way but not running loose, trying to get lost.
SO WHICH CAMPING KITCHEN BOX IS FOR ME?
If you want to keep your camp stove together with all your other camp kitchen gear, and don't mind carrying a two foot wide box (or you have some one to help you) the CKB 1000 is for you. If you find the size of the original a bit intimidating, and don't mind making a second trip to get the stove, then the CKB 650 is your solution.
View
Camping Kitchen Box vs Cabela's Deluxe Camper's Kitchen
by Kurt Huber | Published 5/27/2018
I just had someone email me and ask me how the Camping Kitchen Box stacks up against the Cabela's Deluxe Camper's Kitchen. I guess I should mention that I have never actually seen this particular item in real life, so my opinions are based on what facts I can get from the web site and experience with similar products. I am sure that the Cabela's kitchen is a fine product, I am just making a comparison of functionality and features. My response follows:
I don't know all the reasons folks purchase one or the other, but when comparing the Camping Kitchen Box to the Cabela's camp kitchen (or similar) , ease and speed of use, as well as the light weight are what I think of as the main advantages.
With the Cabela's camp kitchen (or similar) there is a lot of setup involved. When you arrive at the campsite and first you have to unpack and set up the camp kitchen (5 Minutes with practice?) . After it is setup you then take your camping cooking gear out of whatever it is packed in then put it into its place in the Camp Kitchen (5 Minutes? 10 Minutes?) You are now ready to start cooking. At the end of the trip you have to unpack all your equipment from the kitchen and put it back in the containers you bought it in (5 -10 Minutes) and then take down and pack the kitchen itself (Longer then the 5 minutes setup time because you have to stick everything back in its travel case.)
With the Camping Kitchen Box you arrive at the campsite and put it on the picnic table and open it up and secure the doors and all your cooking gear is right at hand in 30 seconds. If you are camping at a site that does not have a table, this typical folding table (which has about the same work surface as the camp kitchen) sets up in less then a minute and comes down as quickly. All you have to do with the Camping Kitchen Box is close it back up and it is ready to go.
Weight is certainly advantage of the Camping Kitchen Box. The Cabala's kitchen is 57 lbs according to the web site. The CKB weighs around 10 pounds if you add in the weight of the table I linked to(25 pounds) the total is 35 pounds.
The Cabela's Kitchen does have a couple other features that are noteworthy. First would be the sink, but I replicate similar functionality with a Plastic Dishpan, The lantern hangers are a nice feature that the Camping Kitchen Box does not have, but placing a lantern on top of the box sitting on top of a table does offer similar functionality. :)
View
Connecting Corrugated Plastic Sheets with Pop Rivets
by Kurt Huber | Published 2/16/2018
Since I have been making the Camping Kitchen Box I have been using plastic ratchet rivets to hold the box together, and they have worked well, except for two of issues. First, if you really pull on them they can come apart, which was not an issues except for a couple of boxes where I used them to hold the straps for the buckles.. When I replaced rivets that held the straps with some pop rivets and fender washers and that worked great. The other issue is that occasionally the plastic rivets would break when I assembled them. This was not an issue when I caught them and replaced them, but it seemed that more and more were breaking and I was not catching them all, which caused a quality issue. I have decided that even though I liked the appearance of the plastic rivets and they were working for the most part, using pop rivets and fender washers for all the connections made for an even more well constructed box.
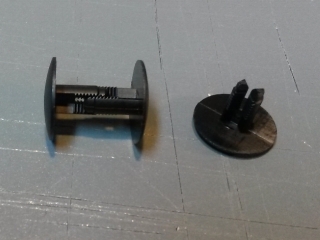
Old Plastic Rivets
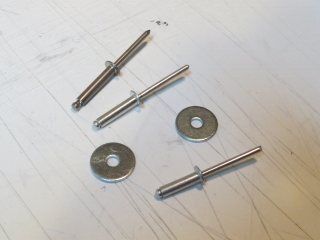
Pop Rivets and Fender Washers
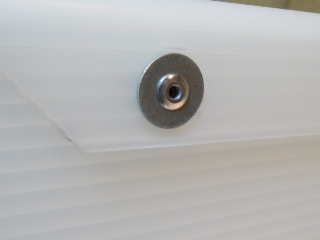
Pop rivets with fender washers, outside view
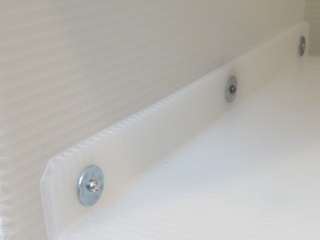
Inside View
For those interested in the technical details, I am using 3/16 inch pop rivets. The rivets are backed up on both sides by 3/16" ID , 3/4" OD fender washers. When I am attaching 2 pieces of 6MM corrugated plastic together, I use a pop rivet with a depth is 5/8 of an inch. When attaching a piece of strapping to to a single piece of 6MM corrugate, I use 1/2" depth rivets.
View
DIY Rope Cutter
by Kurt Huber | Published 1/1/2018
I have posted a quick video on my very simple rope cutter made with nichrome wire, a PC Power Supply a some bits laying around the shop. Please use common sense when playing with electricity and hot wires.
View