DIY Camping Hand Washing System
There are many solutions for washing your hands while camping. One solution that seems to work well is what I call the “Fuel Bulb Primer with Five Gallon Buckets Systems”, or FBPWFGBS. (OK I really dont call it FBPWFGBS, but I did spend a couple moments seeing if I could pronounce it) . This system uses 2 five gallon buckets, one as a water supply and one to catch the water, and a fuel pump primer is used to move the water. The video below gives an overview of the system.
This system has several advantages over just using your drinking water jug to wash your hands. First it is more efficient with water. You pump what you need and no more, as opposed to opening the tap on your water jug, getting your hands wet, and then letting the tap run while you soap up. By the time you are done rinsing you have a nice puddle of wasted water by your feet.Second it is more sanitary, instead of opening the tap on your drinking water with your filthy, germy hands, your foot gets the water flowing safely.
Making Your Own
There are some commercial examples of this system out there, like one from Tye Works (http://tyeworks.com/products/standard-hand-wash-system-by-tye-works) or the Wishy Washy from Partner Steel (https://youtu.be/BGcGm8iv_m8). These may seem a little pricey, but like most do it yourself projects, by the time you add up the cost supplies and the value of your time, the satisfaction is in the creating, not the saving.
Materials

Below is my parts list. Some of the materials I already had, so I just guessed at the cost. You can see that it adds up quickly.Most of the parts came from Lowes, with the exception of the fuel primer pump which was purchased at Walmart. I don’t actually have the fuel filter, but it seems to be a common part of the commercial setups so I have included it for price comparisons.
| Description | Cost |
|---|---|
| Fuel Primer Pump (⅜ inch) | $18 |
| Flat Aluminum Stock ⅛ X 1” X 36” | $7 |
| ¼ “ X 20 X ¾ SS Pan Phillips Head Machine Screw(2) | $1 |
| ¼ “ X 20 SS Wing Nuts (2) | $1 |
| 6’ X ⅜” Inside Diameter Vinyl Hose (2) | $3 |
| Zip Ties | $1 |
| Hose Clamps (2) | $2 |
| Misc | $2 |
| In Line Fuel Filter | $10 |
| TOTAL | $45 |
Tools Required
Hacksaw - For cutting the aluminum stock.
File - for cleaning up the burrs on the aluminum stock
Power Drill - for drilling holes use a ¼ inch bit for the bolt holes and ⅛ inch or whatever is appropriate for your zip ties
Screw Driver- For the hose clamps
File - For cleaning up the cut and drilled aluminum stock
CREATE THE BRACKET FROM THE ALUMINUM STOCK
Below is the cutting diagram for the aluminum stock The 36 inch inch bar is cut into 2 pieces, one 12 inches long and the second 24 inches. This can easily be done with a hacksaw

Drilling Holes
The diagonally placed holes are for the machine screws and wing nut that will eventually hold the two pieces together. If you are using ¼ inch hardware like I spaced above then the holes should be ¼ inch. Note that you probably want to cut the bar first then stack the bars and drill the holes so that everything lines up later.
The 3 sets of perpendicular holes are ⅛ inch and are for the zip ties that hold the vinyl tubing in place. Make sure you have zip ties that fit.
Finally use a file to clean up the burrs from the cut and the holes, and round the corners slightly to cut down on the jabbyness of the pieces.
Bending the Bracket
There is not an exact plan, just follow the picture above. The general goal is to create spring like tensions with the curves.
I bent the ¼ Inch aluminium stock using a combination of my hands, a vice, a pipe and a hammer. The bar was wrapped or hammered over and around the pipe to make the bends One thing that you should pay attention before you make the bends is the way that the holes that will hold the pieces together are lines up. Once you have the pieces bent , assemble them with the machine screws and wing nuts. Note that you can adjust the tension by disassembling the bracket. tweaking the bends and reassembling.
THE REST OF THE ASSEMBLY
Well at this point you are 75% there.
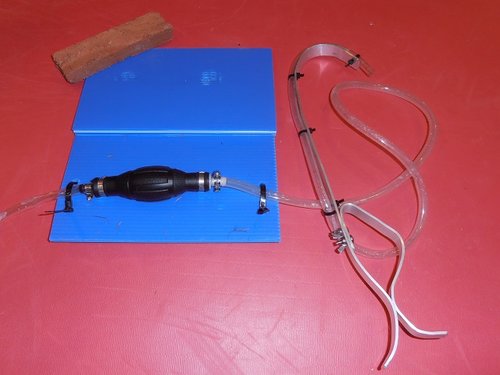
Cut the vinyl tubing into two 3 ft pieces and attach it to each end of the primer bulb, using your hose clamps. Paying attention to the flow of the primer bulb pump. Attach the tubing to the bracket using zip ties.
The end that goes into the supply water needs something to keep the end of the hose weighted down. I used a piece of ½ inch 90 degree PVC connector. The hand washing stations that you can purchase appear to use fuel filters that fit on the ⅜ inch hose. Anything that sinks in water and can be attached to the end of the hose works.
To increase the longevity of the primer bulb / pump you will want to keep it off the ground by attaching it to a board. I went one step further and built a hinged housing with some 6mm corrugated plastic that I have plenty of.
FINAL THOUGHTS
That’s it you should be good to go. Note that the parts used to make this (specifically the primer bulb and the fuel filter if you used one) are NOT food safe, so this is not designed for dispensing drinking water or any other beverages.
